Machine Learning on Windows 10 – Part 1: Install Linux
About two years ago, I was tasked at work to setup a Machine Learning environment. The requirements included setting up an ML development platform for one or more developers. Setting up a production environment that could run any type of machine learning algorithm, and scale to handle data sets of any size, e.g. big data.
At the time, the virtual machines available to me were Windows Servers, so I had to figure out what technologies to use. I found that the Anaconda Package manager was the easiest way to deploy an ML environment. The Anaconda installation contains many open source packages, as well as versions of Python and the Jupyter Notebooks for editing and maintaining ML projects.
At the time, I had to look through much documentation in order to get the Windows versions of each open source library. This was tedious and error prone. Most of the ML and Python libraries, if not all, were developed for Linux, and then ported to Windows by other developers.
Two years later, much has changed. Microsoft has adopted Linux full-on and has released a Linux subsystem for Windows. This subsystem, WSL, allows developers to run a full version of GNU\Linux directly on Windows, unmodified. No need to set up a Virtual Machine or a separate partition and dual boot.
WSL 1 was the initial version and it can run on either Windows 10 or Windows Server. It allows a developer to install several different versions of Linux from the Microsoft Store. Once a version of Linux is deployed, a developer can run all Bash shell scripts, command-line applications, programming languages such as C/C++ or Python, and services such as MySQL and web servers. From the Linux command-line, a developer can mount and access the native Windows file system and invoke Windows applications. This allows developers to edit files, such as Python script or databases, from Windows GUI applications, making editing and maintenance much easier.
WSL 2 is a newer version that only runs on Windows 10. It does not run on Windows Server yet. While WSL 1 was a virtualized environment, WSL 2 is a new architecture that runs a real version of the Linux kernel natively. The primary benefit of WSL2 is file system performance and full system call compatibility.
A nice feature of WSL is that you can have multiple Linux distributions installed and running side by side on either WSL 1 or WSL 2.
In this post, I will install the latest version, at this time, of Ubuntu on WSL 2. In following posts, I will install an ML environment, including Python, Jupyter Notebooks, MongoDB, Hadoop, Spark, and TensorFlow. We will then explore some common ML concepts and algorithms.
- Update to the latest version of Windows 10. My version of Windows 10 was 1909. I had to manually install version 2004. Some things to watch out for:
- Make sure that Virtualization is turned on in the machine BIOS
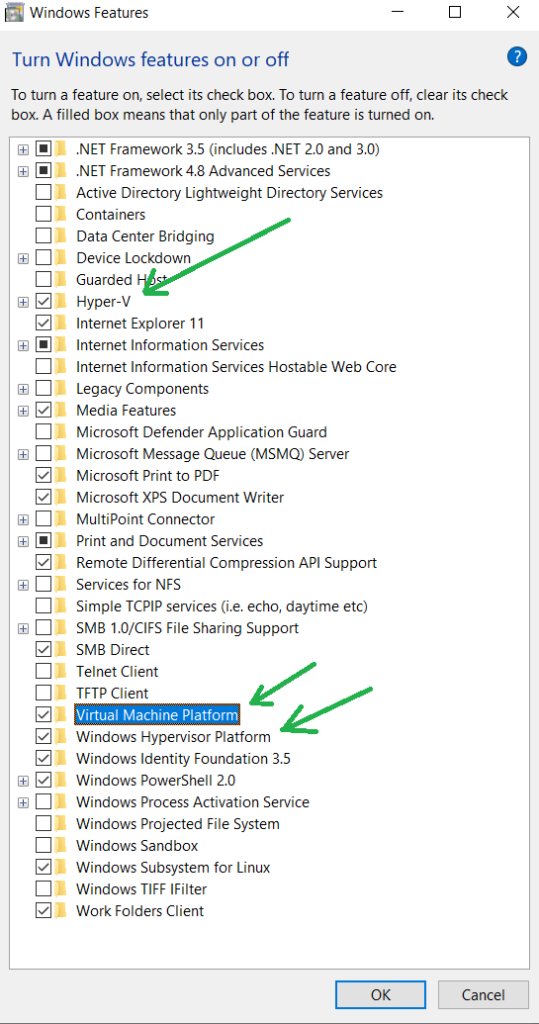
- Go to Control Panel – Turn Windows Features On or Off
- Make sure that the Hyper-V, Virtual Machine Platform, and Windows Hypervisor Platform features are selected.
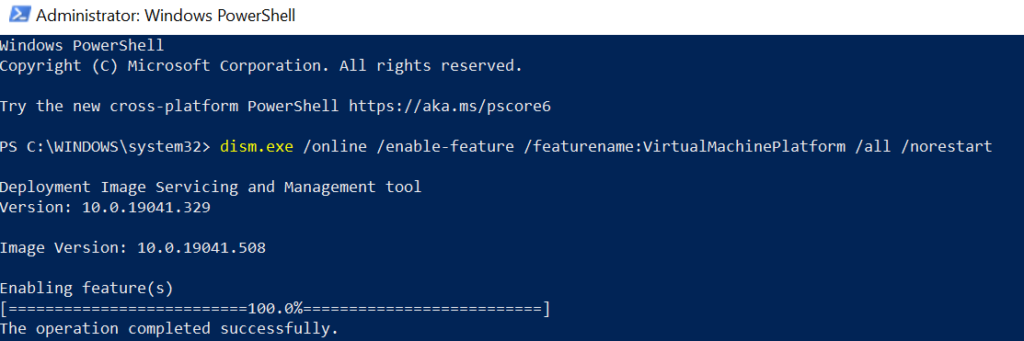
- Enable WSL. Open PowerShell as an Admin and run:
dism.exe /online /enable-feature /featurename:VirtualMachinePlatform /all /norestartIf successful you will see the following:
3. Restart the machine.
4. Enable ‘Virtual Machine Platform’. Open PowerShell as an Admin and run:
dism.exe /online /enable-feature /featurename:VirtualMachinePlatform /all /norestart5. Restart the machine
6. Open PowerShell as an Admin and type wsl. You should see the following:
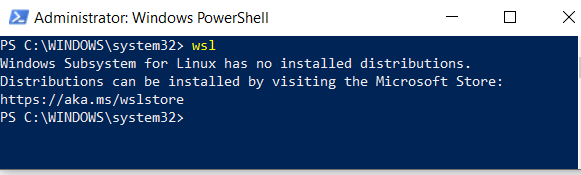
If an error is generated, such as wsl is an unknown cmdlet, make sure that all the correct version of Windows 10 is installed, and the required Windows features from step 1 are selected.
6. Update WSL 2 kernel component
https://docs.microsoft.com/en-us/windows/wsl/wsl2-kernel
7. Set WSL 2 as the default version:
wsl --set-default-version 28. Open the Microsoft Store and get the latest version of Ubuntu. At the time of this writing it is 20200810 build of Ubuntu 20.04.01 LTS
9. Once Ubuntu is installed, a console window will appear showing the installation status. When prompted enter a new user name and password. This will be the Linux admin account and will be able to run sudo commands
Once the above steps are complete, there will be a new Ubuntu icon on the start menu which will launch the Bash shell (Ubuntu command line).
The next post will show some common ways to interact with the Ubuntu command line.
Resources: